Tuesday, November 24, 2015

Holiday Gift Guide for Him

*Affiliate links provided for your convenience. For more info, see my full disclosure here.

Hey, Friends! Please excuse the silence over here on the blog last week. Our computer died and we had to wait for a new part to come. But, all is well now and I'm stoked to get to blog again!

Are you guys starting to purchase Christmas gifts yet? Do you get stumped with what to get for the men in your life? I have just the thing for you--a holiday gift guide geared at the men! This post was supposed to go up last week, but due to the computer problems, I had to wait to finish it up. Thankfully, though, it's up just in the nick of time before the Black Friday deals come out! Whew! :)

My husband helped me curate this list of items for you. He personally owns and loves every single item on this list! They're tried and true favorites!


1) Tape Measure*- Jeremy has two requirements for a tape measure-- it has to have rubber grips and it needs to have the easy read measurements. This one fits the bill!

2) Flex Ratchet Screwdriver*- Jeremy's dad had such a knack for rummaging through our garage and figuring out what tools Jeremy was missing or would enjoy using. He gave Jeremy a flex ratcheting screwdriver a few years ago and Jeremy has really loved it! You just attach any drill bit to the end and suddenly screwing and unscrewing becomes way faster and easier!

3) Dominion*- Our good friends introduced us to this game a couple years ago and it became a fast favorite! We love playing it with friends, but it's also a great two player game! It's one of Jeremy and I's favorite things to do together after the kids go to bed and a great alternative to watching TVsince our tastes in TV shows are polar opposites! Ha!

4* & 5*) Jeremy loves to play video games and has really been loving Destiny and Elder Scrolls Online! If you have a gamer in your life, check out these games!

6) Gaming Headset*- Speaking of video games, Jeremy finally broke down and bought a nice set of gaming headphones. They are surround sound and have a mic for chatting with other players. He loves the sound quality and how light they are on his head!

7) Microsoft Ergonomic Keyboard- Jeremy spends most of his workdays on a computer, so a good ergonomic keyboard was critical for him! He's tried a couple different ones, but this one is his tried and true favorite!

8) Mechanics Gloves*- I bought these gloves for Jeremy the first year we were married and he was having to do car repairs in a scalding hot apartment complex parking lot. He loved having them for mechanic use, but they have become his trusty gloves for so much more! He uses them when doing carpentry work, yard work, car work, etc. Basically, if he's working outside, you can almost bet that he's got these babies on!

Hope this list helps shopping for the men in your life a little easier this Christmas!

Wednesday, November 11, 2015

One Room Challenge: Bathroom Reveal

I'm so excited for today because it's finally REVEAL DAY for the One Room Challenge! Wahoo! You can catch up on our bathroom remodel here: Week 1Week 2Week 3, Week 4, and Week 5!


As a refresher, here's the 90's builder grade bathroom we started with:


Here's where we are now! I still can't get over the difference! HUGE shoutout to my hubby who worked like crazy on this bathroom! He's the best!


The new espresso vanity and bright white sink make everything look so fresh and crisp compared to that old honey colored vanity and yellowed sink! 


We said buh-bye to the old two toned towel ring by spray painting it oil rubbed bronze to match the fixtures. 


I love that the new vanity has legs. It makes it feel more like a piece of furniture instead of a plain stock cabinet. The bottom is actually a drawer that pulls out for added storage! 


The faucet looks so cool in here! It's such a great addition and adds some interest to the space. 


We love the way the water comes out! Isn't it fun?


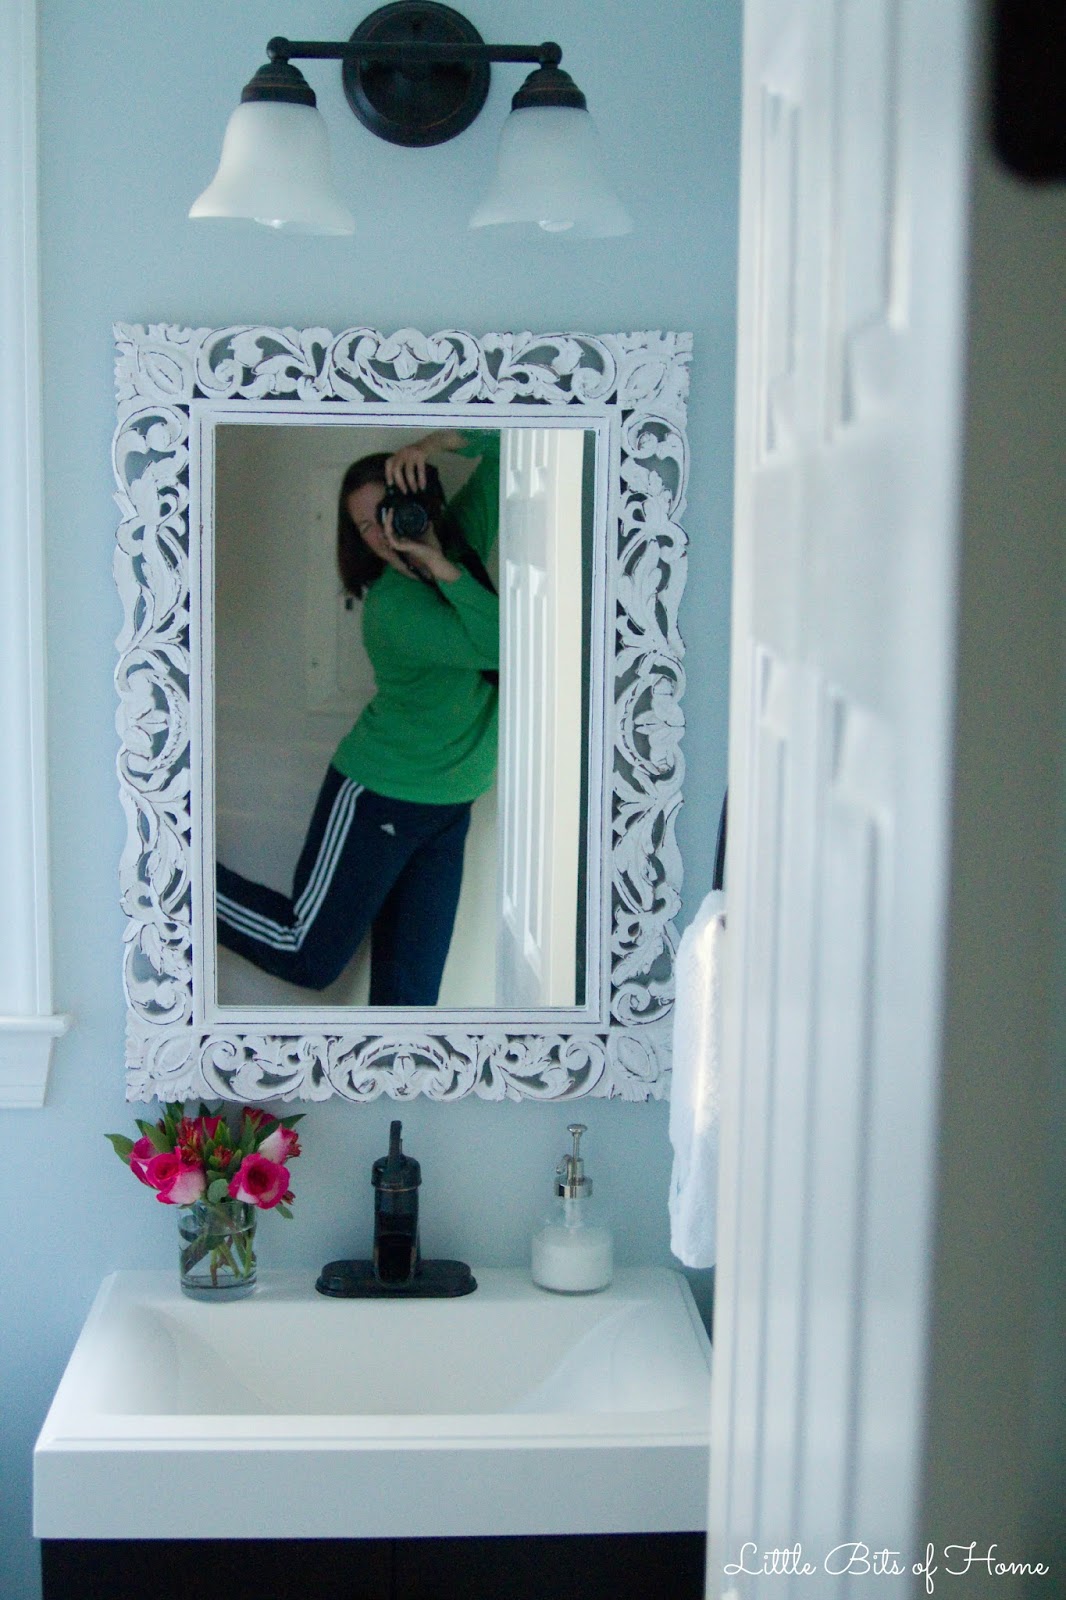
The mirror is probably my favorite thing in the room! Isn't it gorgeous? I found it at Home Goods and snatched it up faster than you can say "Who's your Mama!"


For days after we hung up the mirror, I'd see it and immediately start singing Iggy's "Fancy" and dancing around. Haha! My husband is used to my antics. ;) 


I also found this frame at Home Goods for the artwork I made and thought it complimented the mirror perfectly. 


I still can't believe this light was only $25! Such a steal!


I have had my eye on this shower curtain from Target for years now. I love how fresh and clean it is while still adding a bit of color. 


Here's a shot of our new floors and toilet. The new laminate floors are so.much.better than the old, cracked tile we had before! And, check it out, we have real baseboards now instead of dated tile lining the walls! The floor truly transforms the space!


Here's all that we accomplished!

-Demo tile baseboards
-Rip out vanity, toilet, light, fixtures, and mirror.
-Paint. 
-Install new flooring.
-Replace baseboards. 
-Install new light. 
-Install new vanity and sink. 
-Install new faucet and fixtures. 
-Install new toilet. 
-Remove blinds and frost window.
-Fill nail holes in baseboards.
-Decorate

The only thing we didn't get to check off of our list was frosting the window. We are waiting until a day that we will be out of the house for a while, since the spray window frost is really strong. But, other than that, we were able to finish everything and cross this room off our list! We are SO happy with how it came out! I may or may not open the door just to a catch a glimpse of it every now and then. And I may or may not have done a giddy victory dance on the step stool as I was taking these pictures. ;)


Sources: 

Light, vanity, floors- Home Depot
Mirror, frame- Home Goods
Faucet, toilet- Lowes
Soap pump, vase (actually just a clear cup!), rug, shower curtain- Target
Shower curtain rod and rings- Walmart
Trash can, toilet paper holder- Marshalls 
Towel- Kirklands

(You can't see the trash can or the toilet paper holder in the pictures, but I had to include them in the source list because they were way cheaper at Marshalls than anywhere else. Be sure to check there if you're in the market for those items!)

Check out the other One Room Challenge room reveals over at Calling it Home!

Tuesday, November 10, 2015

Easy Kids Thanksgiving Craft


Hey, Friends! I've joined up with my blogger friends to bring you all some fresh, new Thanksgiving crafts! Be sure to check out all their awesome projects at the end of this post and join in to our #homeforthefallidays Instagram game each week! 

I did a quick and easy Thanksgiving plate that you can whip up with your kids. I love making things with my kids that can double as decor, don't you?


I've made a decorative Christmas plate with both of my kids and love displaying them each year, so thought I'd make a Thankgiving version this year. I've had this cute little turkey pinned for a long time now, so decided to paint a similar one on a plate using my kid's fingerprints as the feathers. 

I found this cute plate at Home Goods for a couple dollars and love that I can string ribbon around the edge! To create the turkey, I simply had my kids paint an arch with their fingerprints, let it dry, then repeated using the next color.  


After all three rows of feathers were dry, I painted on the turkey body and used paint pens to draw in details and lettering on my plate, sealing it all off with Mod Podge. SO simple and I love that my kids helped me make it!


Check out all the other Thanksgiving projects below! 

1. UpCycled Fall Basket Wreath - Shabby Grace Blog 
2. Easy Kids Craft Turkey Plate - Little Bits of Home 
3. Thankful Everyday Canvas Art - Beauteeful Living 
4. Gilded Pumpkins - Pocketful of Posies 
5. Fall Paper Wreath - Our House Now A Home
6. Thankfulness Tree - Oh The Fun 
7. UpCycled Thankful Sign - Green With Decor 
8. How to Make a Velvet Acort - Lehman Lane 

Wednesday, November 4, 2015

One Room Challenge: Installation


*Affiliate link provided for your convenience. For more info, see my full disclosure here.

Hey, Friends! My brain is fried and I'm holding my eyes open with toothpicks at the moment. How is it only Wednesday?! Ha!


It's already Week 5 of the One Room Challenge! If you need to catch up, here's a recap of Week 1Week 2, Week 3, and Week 4! This week is all about installation and you can finally see the bathroom starting to come together and look like a real, operational bathroom instead of a construction zone! Wahoo!

With the painting, flooring, lighting, and baseboards in, we were finally able to get to installing the big stuff! The first thing to be installed was our $50 vanity. Yes, you read that correctly! We came across this vanity/sink combo on clearance for only $50 about a year ago at Home Depot and immediately scooped it up. We weren't ready to do the bathroom makeover just yet, so we stored it unopened under the house until our finances allowed us to tackle the bathroom remodel. It was SO exciting to pull the vanity out and get to use it!


I really like the clean lines of the vanity and the sink is sleek. The vanity has legs at the bottom, so it has more of a stand alone furniture vibe than just a regular stock cabinet. It has an espresso finish, but it is hard to tell in these pictures. Boo. :( Espresso wasn't my first choice for color, but it was so cheap that I figured if I didn't like it as is, I could paint it. Lucky for me, I like the espresso and don't need to paint.

After the vanity was installed, we got to work on the faucet. And by "we" I mean "he". I was busy chasing kids and cooking dinner, so Jeremy had to solo the installations. I owe him some fried chicken and fresh cookies, for sure!

I was planning to just purchase an inexpensive bronze faucet to try to keep our costs down. Jeremy has had his heart set on certain faucet for years, though, so decided to shell out the extra money from his saved spending money to upgrade the faucet. Since he was using his saved money, I let him do the faucet shopping. He knocked it out of the park! How cool is this faucet?!


It makes me want to play in the water! Haha! Here's Jeremy testing it out!


After the vanity was squared away, Jeremy got to work on installing the new toilet. I had my heart set on this* toilet (why in the world do I have such a strong opinion on toilets?!), but it was too expensive. We weren't originally planning on replacing the toilet at all, so we just couldn't justify the extra expense just to have a classier throne. Instead, we picked up this budget friendly model and have been happy with it so far. Our old one did not work well and the bolts were completely rusted through, so it is a great upgrade!


This was our first time replacing an entire toilet, so it was a new experience. But, it went without hitch and now we happily have an operational downstairs bathroom!


Here's where we are on our list! Get ready for the big reveal next week! I'm thrilled to finally get to show you all the pretty parts!!!

-Demo tile baseboards
-Rip out vanity, toilet, light, fixtures, and mirror.
-Paint. 
-Install new flooring.
-Replace baseboards. 
-Install new light. 
-Install new vanity and sink. 
-Install new faucet and fixtures. 
-Install new toilet. 
-Decorate (I'll show you that next week!)
-Remove blinds and frost window.
-Fill nail holes in baseboards.

Be sure to check out the other One Room Challenge rooms over at Calling it Home!


Linking up with Calling it HomeSavvy Southern StyleRemodelaholic, and many other awesome blogs!

Tuesday, November 3, 2015

Quick Tip: How to Remove Fabric Pilling from Upholstery


*Affiliate link provided for your convenience. For more info, see my full disclosure here.

Hey, Friends! Happy November! I can't believe we're about to be in full swing holiday mode! I have a Thanksgiving project as well as a couple Christmas projects coming your way soon!


Before all the holiday madness starts, I wanted to share a quick tip with you! You may remember that we have been slowly redoing our living room (See all of our living room projects here) and purchased a new sectional a year and a half ago. The original sectional pilled like crazy and the fabric slipped down on the cushions after only a couple months, so we exchanged our sectional for a different sectional.

The new one is much nicer and more comfortable, but it's doing that blasted pilling thing again and it's driving me bonkers! We've never had trouble with any of our furniture pilling until our sectional adventures. Not impressed. Getting our sectional exchanged took months and was a giant hassle. We really didn't want to go down that road again, especially since, unlike last time, nothing else was wrong with the sectional.

I made it my mission to figure out how to remove the pilling and have finally found the key! Introducing a fabric shaver! I saw one at The Container Store, but it was tiny and expensive. Thankfully, Amazon had one for only $12.99, so I decided to give it a try. Here's the exact one I bought*: Conair Battery Operated Fabric Defuzzer - Shaver


People, it is the BEST! I used gentle, slow, back and forth motions over the cushions on the highest setting and it did the job! The sectional had a year's worth of pilling collected on it, so I had to do a couple passes to get every last bit of pilling off. Still, it only took me about 20 minutes to do our entire sectional. Check it out! See all that nasty, nubby pilling?


Now, look how soft and smooth our couch is again! Good as new!


And a little before and after action for you-- the cushion on the right is finished and the cushion on the left is anxiously awaiting its makeover. ;) 


Pretty awesome, right? I'm so happy to have my soft couch back! Now that I have the fabric shaver, I can just go over any rough spots as they pop up! 

I read a lot of reviews saying that the fabric shaver saved sweaters and other materials and I'm itching to try it out on some of my clothes. Just be sure to test in an inconspicuous area and keep the fabric pulled taut!

I'll be back Thursday with another bathroom update! I can't wait to show you the faucet my hubby picked out!


Related Posts Plugin for WordPress, Blogger...